To create a track in Roll Call, do the following:
- Expand the Tracks menu on the left side menu.
- Click on the Add a Track menu.
Alternatively, you can get to the Add a Track window by:
- Expanding the Tracks menu on the left side.
- Clicking on Tracks Summary.
- Clicking on the +ADD button in the lower left corner.
From the Add a Track screen, enter the following information:
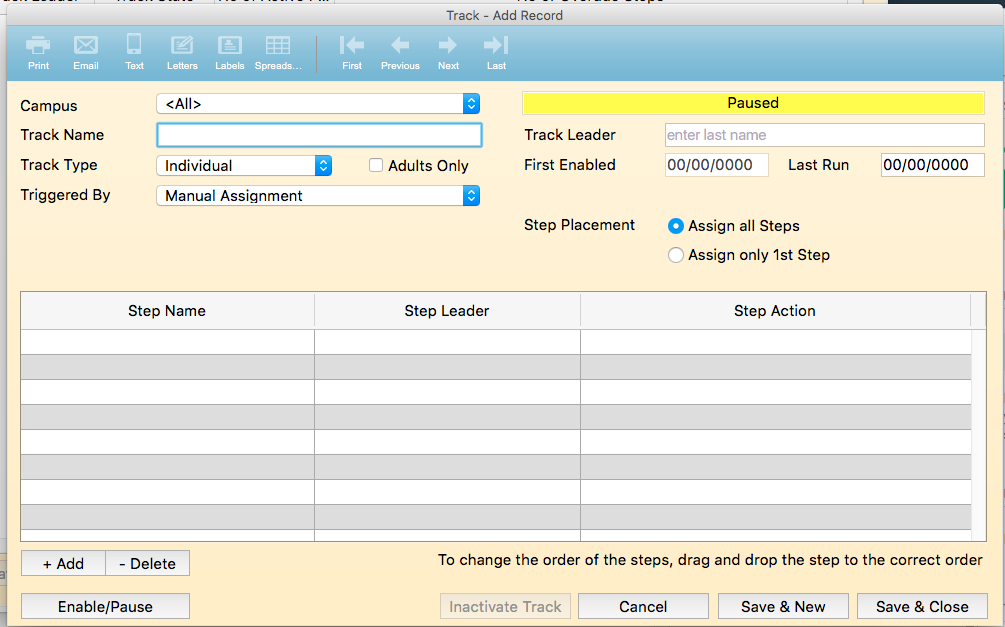
Campus If your organization uses multi-campus, you’ll have a field on the Add A Track form, to indicate for which campus this track applies. If the track should be used church-wide, choose All as the campus. If it is for a specific campus, select that campus from the drop down list.
Track Name The track name is the name of the process, such as “First Time Visitor Follow Up” or “Membership”.
Track Type The track can be for an individual, or for the entire family. A membership track would probably be for a specific individual. What does the individual need to do to become a member of the church. On the other hand, the visitor follow up track would probably be for the family. There might have been 4 people from the family that attended for the first time, but you ‘d only want to send one letter or email to the family.
Triggered By The Triggered By field indicates how a person or family gets assigned to a track. Below is a listing of the options.
Manually assigned - if the trigger is manually assigned that means a Roll Call user will come into the system and pick specific people to be assigned to that track.
Has Attended – this type is automatically assigned by the system when a person has met the attendance criteria. An example of this type of assignment might be for first time visitors. After they attend for the 1st time, the system would assign them to the “First Time Visitor” track. To implement this:
- Select Has Attended from the Triggered By drop down.
- Indicate the number of times they must have attended to be assigned the track
- Indicate the type of attendance that should be considered. The options are:
a. All Attendance – this will look at all attendance data including worship service, group and event attendance. b. All Worship - this will look at attendance for any worship service. c. Selected Worship – this option will allow you to select which worship services you would like to consider. d. All Groups - this option will look at attendance data for all group/class meetings. e. Selected Groups – this option will allow you to specify which group/class attendance should be considered. f. All Events – this will look at attendance for all of your events. g. Selected Events – this option will allow you to select specific events.
Has Not Attended - this trigger type will automatically assign a person to the track if they have not attended in so many weeks. An example of this type of assignment might be to reach out to your regular attenders after they miss 4 weeks of worship. To implement this type of track assignment:
- Select Has NOT Attended from the Triggered By drop down.
- Indicate the number of weeks they must have missed to be assigned the track
- Indicate the type of attendance that should be considered.
The options are:
a. All Attendance – this will look at all attendance data including worship service, group and event attendance. b. All Worship - this will look at attendance for any worship service. c. Selected Worship – this option will allow you to select which worship services you would like to consider. d. All Groups - this option will look at attendance data for all group/class meetings. e. Selected Groups – this option will allow you to specify which group/class attendance should be considered. f. All Events – this will look at attendance for all of your events. g. Selected Events – this option will allow you to select specific event.
- Indicate the day of the week you’d like the system to run this assignment process. If you typically record attendance on Monday, you’d probably want to run this on Tuesday.
Has Given – this trigger type will automatically assign a person/family to the track if they have met the giving criteria. Let’s say you wanted to send a thank you not to people after they give the first time. You could use this type of track assignment. To implement this type of track assignment:
- Select Has Given from the Triggered By drop down.
- Indicate the number of times they must have given to be assigned to the track
- Indicate the fund that they must have given to, to be assigned to the track. The options are:
a. Any Fund - this will look at all giving regardless of the fund. b. Selected Fund - this will allow you to select specific funds. So if you only want to assign the track to people who gave to the building fund, for example, you can select building fund.
Completion of a Track - this trigger type will automatically assign a person to a track upon completion of another track. This type of track assignment could be used for a discipleship series. You could have Discipleship 101 that is a series of classes. Once they finish that series of classes, you’d like to assign them to Discipleship 102. To implement this type of track assignment.
- Select Completion of a Track from the Triggered By drop down.
- Select the Track that must be completed
Completion of a Group/Class – this trigger type will automatically assign a person to a track upon the completion of a specific class or group. A good use for this type of track assignment would be a growth track. Once a person finishes the first class, you could enroll them in the next class. To implement this type of track assignment:
- Select Completion of Class/Group from the Triggered By drop down.
- Select the specific group/class that must be completed.
Entry of a Custom Field - this trigger will automatically assign a person to a track when a Roll Call user enters information in a specific custom field. For example, you might wish to add a person to the Discipleship Track when they are baptized. You could have a custom field for baptized date … then automatically assign to the track when the baptized date is entered. To implement this type of track assignment:
- Select Entry of Custom Field from the Triggered By drop down.
- Select the specific Custom Field that must be entered to trigger the assignment.
Track Leader The track leader is the person on your staff or a lay person who is responsible for monitoring the track process. The track leader will receive an email when people are assigned to their track. They will also receive periodic status reports of how many people have entered the track, are in process and have completed the track, as well as a listing of overdue steps.
The track leader must be a person that has a profile in Roll Call. To indicate who the track leader is, enter the last name of the person who will be responsible for this track. Once you enter the last name, press the tab key. A list will be presented with all the people in Roll Call with that last name. Choose the appropriate person.
Step Placement A track is made up of a series of steps. When a track is assigned to a person/family, the steps can be assigned one of two ways:
-
Assign All Steps - With this method, all the steps associated with a track as assigned to the person at the time that the track is assigned. For example, if your First Time Follow-up track consists of 3 steps (Email, Phone Call and Invitation Post Card) All those steps would be assigned to your first time visitors automatically.
-
Assign only 1st step – With this method, only the 1st step would be assigned to the person when the track is assigned. In our example of an Email, Phone Call, Post Card, only the email step would be assigned to the person. When that step is complete, the next step, Phone Call would be assigned. When the Phone Call is complete, the Post Card would be assigned.
Defining the Steps
To begin entering the steps for the track, click on the ADD button in the lower left. The Step Definition window will be displayed. From this window, enter the following information.
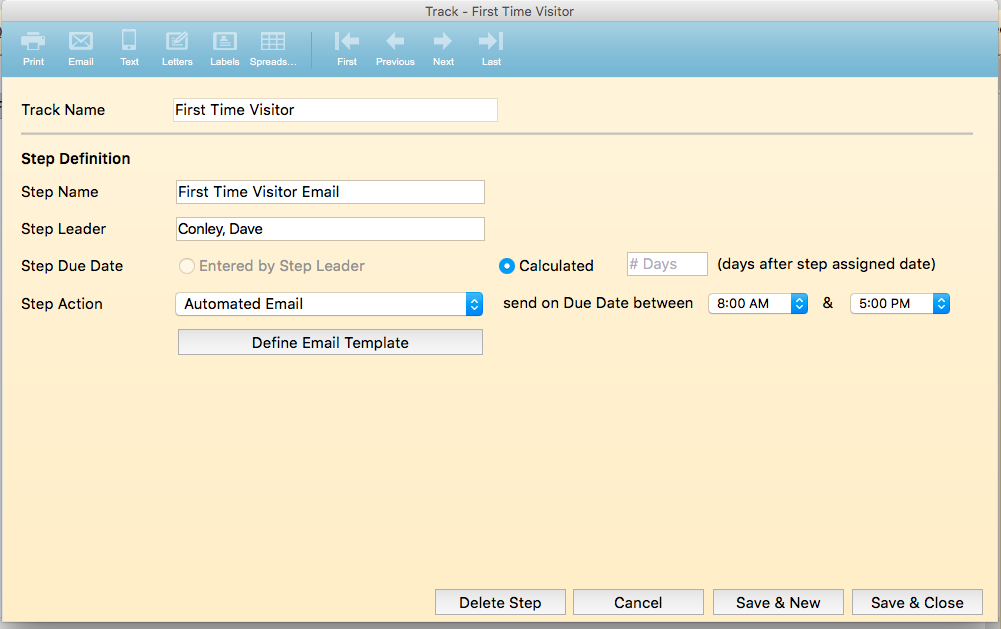 Step Name
The step name is a description of this specific step. For example Send First Time Visitor email or Guest Follow Up Call.
Step Name
The step name is a description of this specific step. For example Send First Time Visitor email or Guest Follow Up Call.
Step Leader The step leader is the person on your staff or a lay person who is responsible for actually performing the step or monitoring step if it is automated. The step leader will receive an email when people are assigned to their step. They will be able to view all their “to-dos” based on the step assignments on the Roll Call dashboard or within their account in Roll Call Connect. The step leader will also be sent periodic status reports listing all overdue steps.
The step leader must be a person that has a profile in Roll Call. To indicate who the step leader is, enter the last name of the person who will be responsible for this step. Once you enter the last name, press the tab key. A list will be presented with all the people in Roll Call with that last name. Choose the appropriate person.
Step Due Date There are two options for setting the Due Date on a step.
-
Calculated. When this option is chosen, the due date will be calculated based on the date the step was assigned plus the number of days entered.
-
Entered by Step Leader. With this option, the step leader is responsible for going into the assigned steps and manually entering a due date.
Click on the radio button by the option you’d like for the step. If you choose, Calculated, make sure to enter the # days.
Step Action The step action indicates what actions needs to be completed, for this step. There are 11 options for step actions. They are as follows:
Automated Email – with this step action, the system will automatically send out the email on the due date. When you select this step action, you’ll need to click the DEFINE EMAIL TEMPLATE for an html editor to set up the subject and body of your email. You must also select the time that you’d like the email sent.
Manual Email - by selecting manual email, the step leader will be responsible for creating and sending the email.
Automated Text – with the automated text, the system will automatically send the text on the due date. You must set the time ranges that you’d like the text sent. Use the Text Message area to enter the text you’d like sent.
Manual Text – by selecting manual text, the step leader will be responsible for creating and sending the text.
Letter - when letter is selected, the step leader is responsible for creating and printing the letter. A letter template may be created within Roll Call for use with this step action.
Automatically Enroll in Group - with the automatically enroll step action, a person will be enrolled into a specific group/class by the system. After selecting this action, you must also choose which group the person will be enrolled in.
Manually Enroll in Group – by selecting manually enroll in a group, the step leader will be responsible for enrolling the person into a specific group.
Phone Call – by selecting phone call, the step leader is responsible for making a phone call to this person.
Personal Visit – by selecting personal visit, the step leader will be responsible for making that visit.
Background Check – by selecting background check, the step leader will be responsible for making sure a background check is completed for the person.
Custom - the custom step action can be used for any other actions that must be performed for this track or process. When you select custom from the drop down, you’ll also be able to enter a description of the custom action.
When you have completed entering the information required for the step, click on SAVE & CLOSE to save the step information and close the window. If you have additional steps that must be entered for this track, you may click SAVE & NEW to save this step and begin entering another step.
Pause/Enable When you begin setting up a track definition in Roll Call, it’s state will be Paused. This means that no processing will happen with this track yet. When you have completed the track definition, click the ENABLE/PAUSE button in the lower left. This will change the state to ENABLED. When a track is enabled, it can be assigned to people. If there are automated steps as part of this track, those will only be processed for enabled tracks.