To create quarterly receipts, do the following:
- Expand the Contributions menu.
- Click on the Bulk Receipts menu item. The Contribution Receipts window will be displayed.
- Choose Annual Receipt from the Receipt Type drop down.
Criteria
From the criteria tab, you can choose the type of receipt you want and what information should be displayed on the report.
Enter the following information:
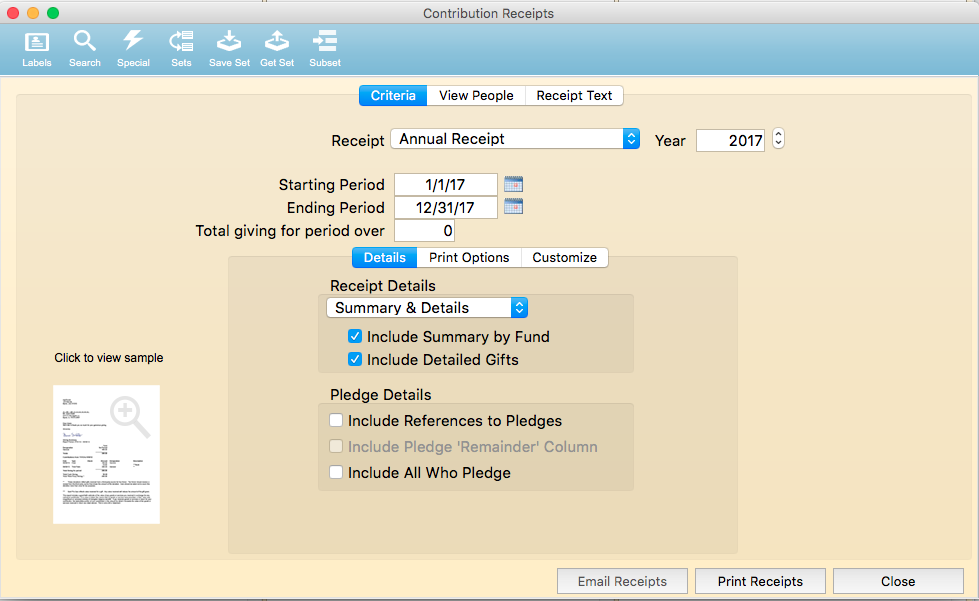
Year - Indicate the year that these receipts are for.
Period Starting - This date is defaulted to the beginning of the quarter or year you selected. These dates may be changed.
Period Ending This date is defaulted to the end of the quarter or year you selected. This date may be changed.
Total Giving for Period Over –If you only want to produce statements for folks who gave over a certain amount, enter that amount here.
Notice the tabs across the middle of the criteria page. On the Details tab enter the following information:
Receipt Details – choose if you’d like the receipt to only have a grand total or if you’d like it to display summary information by fund. You may also choose to display each individual gift.
Include Summary by Fund – If you selected Summary & Details under Receipt Details, you can mark this box if you’d like to display the summary information by fund.
Include Detailed Gifts – If you selected Summary & Details under Receipt Details, you can mark this box if you want to list each contribution for the period.
Include References to Pledges – Under the Pledge Detail section, mark this box if you’d like to see the pledge information for each fund that this donor contributed to. This will add a Pledge Received and Pledge Total column to the report.
Include Pledge Remainder – if you would like to include a column Pledge Remainder mark this box.
Include all who Pledge – if you want to create a quarterly statement for each person who pledged regardless of their giving for the quarter mark this box.
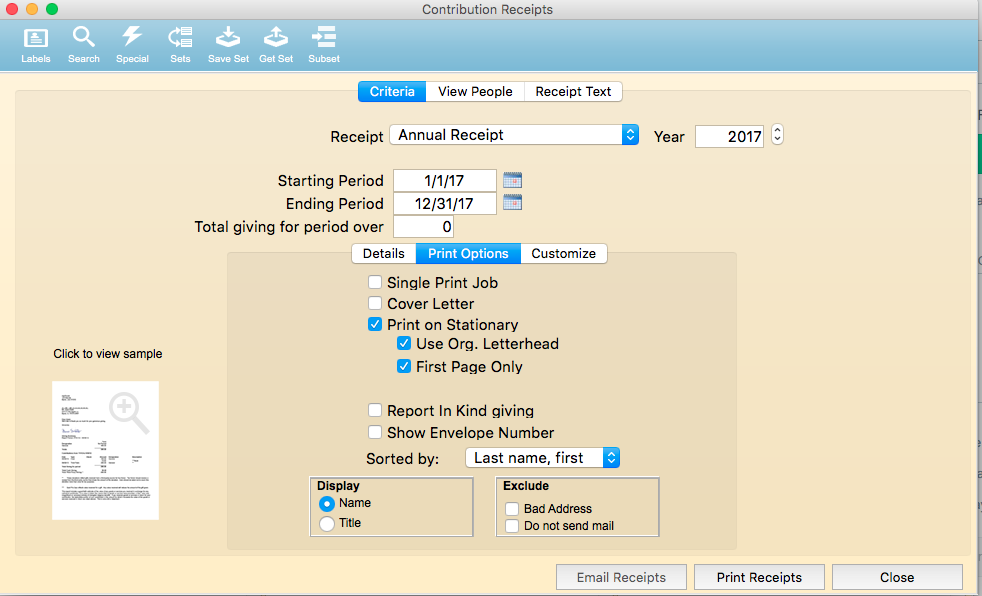
From the tabs across the middle of the criteria page, click on Print Options to make the following selections: Single Print Job – under the print options section, mark this box if you want Roll Call to create 1 large print job for the quarterly receipts. If you will be duplexing the print job (printing on both sides of the paper) you do not want to create a single print job. If you are emailing receipts you do not want to create a single print job. If you are using a large copier printer that requires a project code, you would want to check this box.
Cover Letter – if you’d like to print a cover letter before each statement, mark this box. Use the text tab to create your cover letter.
Print on Stationary - mark this box if you will be printing the statements on letterhead. By checking this box, the churches return address will not be printed on the statement. The statement will begin about 2 ½ inches down the page.
Use Org Letterhead – if you would like to pull in your letterhead graphic to print directly on the receipt, mark this box.
First Page Only - if you will only be using stationary for the first page of the receipt, mark this box.
Report In Kind giving – if you entered property or in-kind gifts without an associated amount and you want to display the item descriptions in the lower section of the receipt, mark this box.
Show Envelope Number – if you would like the envelope number printed on the statement, mark this box.
Sorted By – choose the sort order of the print job. Do you want the receipts sorted by zip code or by name.
Exclude – to exclude receipts for folks who have an address marked as “bad” or “do not send” mark this box.
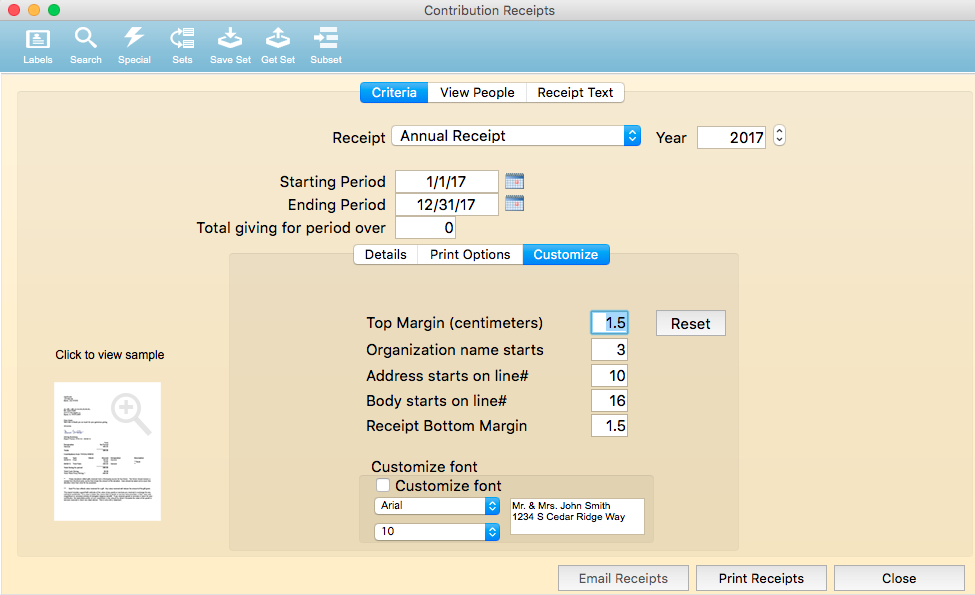
From the tabs across the middle of the criteria page, click on Customize to change the font and alignment.
Top Margin – the number of centimeters required for the top margin.
Organization Name – the number of lines down that the organization name starts.
Address starts on line# - the number of lines down that the donor’s address starts.
Body starts on line# - the number of lines down that the body of the receipt starts.
Customize Font – mark this box if you’d like to change the font and size for the receipt. This may take some trial and error to make sure the summary section columns fit on the receipt.
Font – choose the font you’d like to use for the body of the receipt.
Size – choose the size of the font you’d like to use for the body of the receipt.
Text
There are several different types of “text” that can be used to customize your receipt.
They are as follows:
Top Text – The top text area is used as a thank you note at the beginning of the statement. If you have a verse or a paragraph that you’d like printed at the beginning of the statement, use the top text area. If you have a large thank you note, we recommend you use the cover letter section.
Cover Letter – The cover letter is a 1 page letter that will be printed before each statement.
Bottom Text – The bottom text area is used as footer text. It typically indicates no goods or services were received.
NonCashGifts – if the donor had any non-cash gifts where an amount was assigned to the gift, an asterisk will be placed beside the amount. Then at the bottom of the statement, there will be an asterisk with the verbage you enter for non-cash gifts. Usually this would state that the donor is responsible for determining the fair market value of the gift.
Third Party Gift – if a donor gave a foundation monies to donate to your ministry on their behalf, the foundation is responsible for giving them a receipt. However, you would want to include the gift with a notation that the “third party” is responsible for receipting them.
QPQ Gifts – if the donor received something of value for their contribution, maybe a CD or T-shirt, the QPQ value is indicated on the receipt. Use the QPQ Gift text to indicate that the amount of the item is reduced from their total contribution.
In Kind Gift – if you have a property contribution where no value was assigned, these gifts are listed underneath the detail section of the statement. This text will be used as the header for the In Kind Gifts.
Org Letterhead – if you’d like to pull in your letterhead graphic so that the stationary and receipt are all printed at once, use this section.
To enter the text you’d like displayed on the statement, do the following:
- Click on the Receipt Text tab.
- Click on the type of text you’d like to enter.
- Enter the text and format it as appropriate.
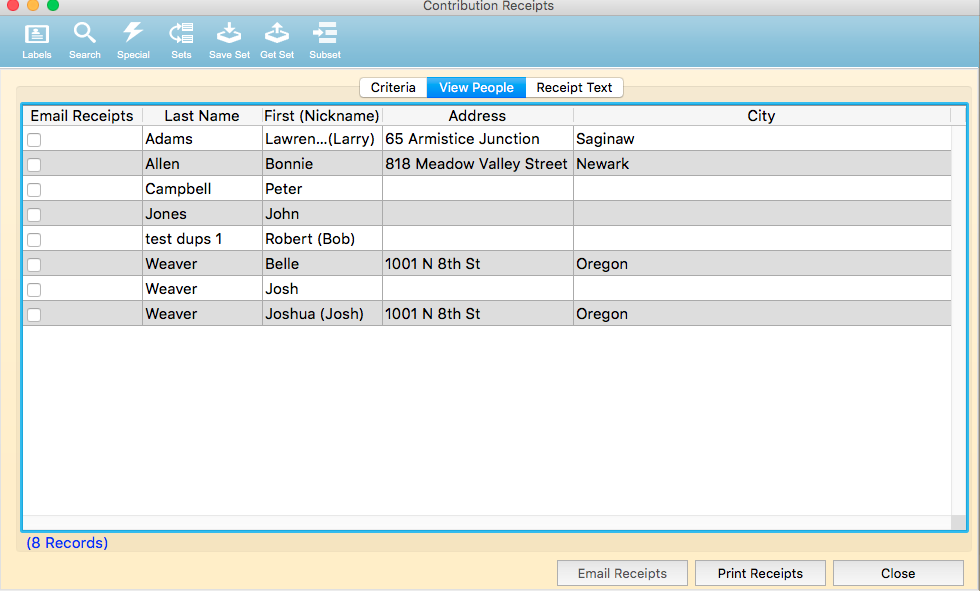
View People
The view people tab is used to review the list of people that will be getting a statement. If you’d like to print a receipt for all these people, click PRINT RECEIPT. If you only want to print them for several of the people in the list, highlight the people that you want, then click PRINT RECEIPTS. It will only print statements for those people that were highlighted.
Printing/emailing your receipt
Once you have set up your criteria, reviewed the list of people and set up your text areas, click on PRINT RECEIPTS. The statements will be printed for everyone in the view people tab that does not have Email checked. If you want to print a receipt for everyone in the list regardless of the Email status, simply highlight all the people, then click PRINT RECEIPT.
If you’d like to email the statements, click EMAIL RECEIPTS. You will be given the choice to simply create a pdf for each statement, or to create pdf and send email. The receipts will be emailed to everyone in the list that has Email checked. If you want to override the Email status, highlight everyone you’d like to email a statement, then click SEND EMAIL.