To use Roll Call’s child check in/out system you must “sign into” the system as a check in user. The type of user determines the screens you will see. So the first thing you will need to do to activate the security system is to set up the “check in” type users.
Activate Roll Call Security
To activate the security system with in Roll Call you must give the Director/Administrator user a password. To do this:
- Expand the Check In/Out menu.
- Click on the Setup menu item.
- Enter the password you’d like to give to Director. Then re-enter that password to confirm.
- Click SAVE. Make sure to save this password before you click NEXT to go to the next step in the process.
Create Check In Users
After you’ve entered the Director password and clicked NEXT, you will be at the window to add check in users. To add a check in user, click on the plus sign in the lower left of the window.
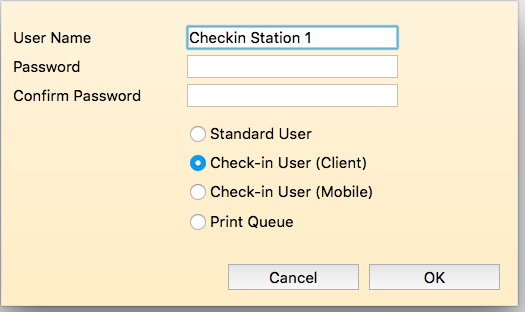
Enter the following information:
Username – enter the name for this specific check in user.
Password – enter a password for this specific user or leave it blank.
Confirm – re-enter the password if you entered one.
Check-In User (Client) – make sure to mark this option if the user will be logging into a computer check in station.
Check-In User (Mobile) – mark this option if you are creating a user that will be logging into a mobile device to perform check in through our Mobile Check In add-on.
Print Queue User – mark this option if you are creating a print queue user that will manage the nametag print jobs for mobile check-in.
Click OK to save this information. You are now taken to the window to select the properties for this check-in user.
Check-In User (Client) - Options
If you are creating a check-in user that will be used on a computer check-in station, there are a variety of options that will affect what is displayed on the screen and how the check in station operates.
There are three tabs with different options. The Permissions tab allows you to define how the check-in user will operate. The Check-In Options tab will allow you to define which events/ classes/ groups are available to check into. The Appearance tab allows you to define color schemes, background image and logo.
On the Permissions tab, choose the following:
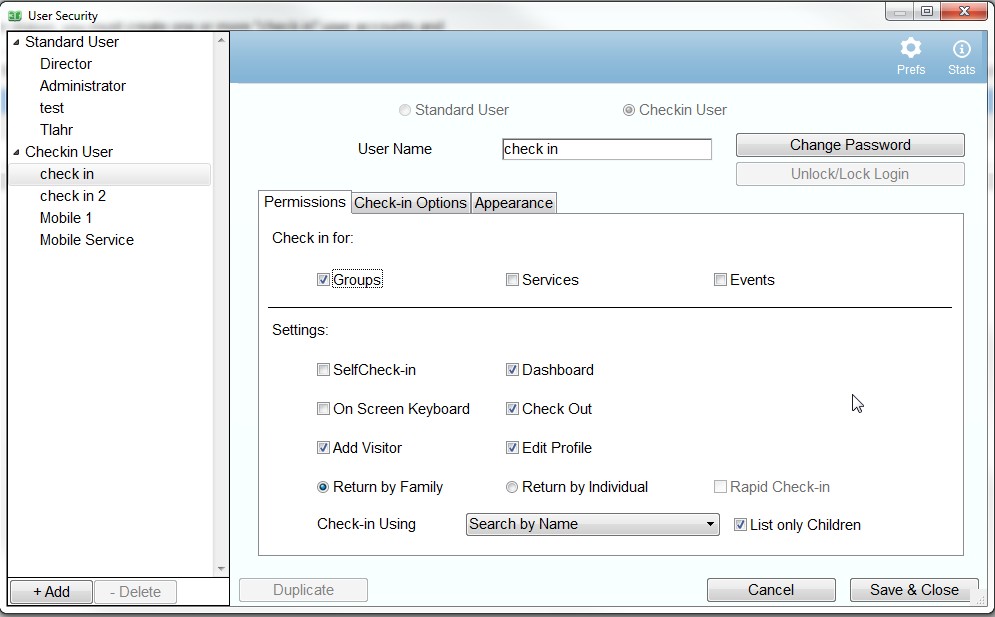
Self Check In – if the check-in user has “self check in” marked, this user will not be able to view any address information from the people list screens. This user will not be able to print the checkin roster or exit the program without a password. Use this option for “unmanned” stations.
Dashboard – if this option is marked, the check-in screen will include a tab called Dashboard. When the user clicks on the Dashboard tab they will be able to view how many people have checked into each class today. They can further drill down and see who is checked into each class. We recommend using this option only for “manned” stations.
Default Campus - if system preferences are set to allow multiple campuses, each check-in user can have a default campus defined. This means that the user will only be able to check into groups/classes/services that are from that campus. For example, if the check-in user has a default campus “Southside”, they will only see groups that also have Southside as the campus.
Touch screen – if the check-in user has “touch screen” marked, a virtual keyboard will be displayed on the screen.
Rapid Check In – if the check-in user is marked as “rapid check in” and you are checking in by “individual” and the student is only enrolled in one class that is meeting that day, the system will automatically check them into that class.
Check-Out – if the check out option is marked, then that user can also check students out through the system.
Add Visitor – if the add visitor option is marked, there will be an ADD VISITOR button on the check-in screen. This will allow the user to enter basic information about the visitor and check them into the appropriate class or meeting.
Edit Profile – if the edit profile option is marked, an EDIT PROFILE button will be included on the Options page so that the user can update a person’s profile information. For example if a student needed to update their email or address, this could be done through EDIT PROFILE.
Check In Using – if you are not using a barcode scan or fingerprint scan to identify who is there to check-in, you will need to identify them based on their last name, last four digits of the phone number or the family number.
Return Families or Individuals – if you are doing a bar code scan or fingervein scan and have “return by family” checked, a list of all the family members will be returned when you perform the scan. If you are searching by name, phone or family number, a list of families will be returned that meet the entered criteria. Then the user will need o highlight the appropriate family. Next a list of family members will be presented so you can choose the ones that will be checking in.
If you are doing a barcode scan or fingervein scan and have “return by individual” checked, only the person assigned that bar code number (or fingerprint) will be returned. Typically you would use this to check students into a youth group or adult class. If you are searching by name, phone or family number and have “return by individual” checked, a list of people that meet that criteria will be displayed. For example, if you search by name and enter “Smith”, a list of everyone who has the last name “Smith” will be returned. You can highlight one or more from the list to check them in.
List Only Children – if you are using the system to check kids into your Children’s Ministry or Daycare, you can limit the name that are returned to “only children”.
The Check In Options tab allows you to set which groups/classes will be displayed when the user
hits the EDIT button.
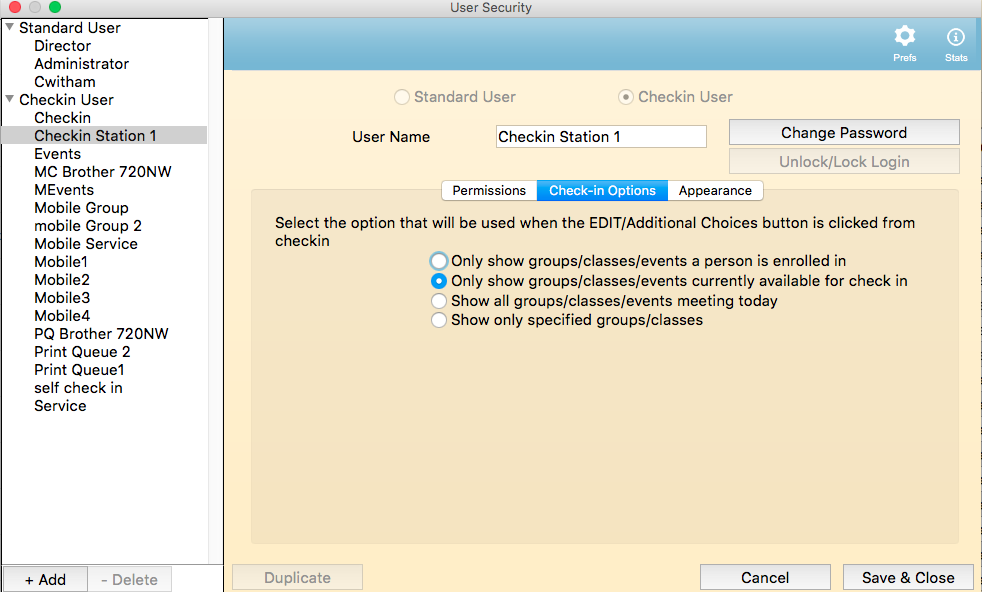
The different options are as follows:
- Only show groups/classes a person is enrolled in. This option will limit check-in to only those classes that a child is pre-enrolled in or to recommended classes based on the age or grade range in the group definition.
- Only show groups/classes currently available. This option will limit check-in to those classes that are currently meeting within the check in timeframe window.
- Show all groups/classes meeting today. This option will allow check-in, into any classes/ groups that are meeting today.
- Show only specified groups/classes. This option will allow you to choose the specific classes/groups that are available.
The Appearance tab allows you to set what the check-in screen will look like. Your options are:
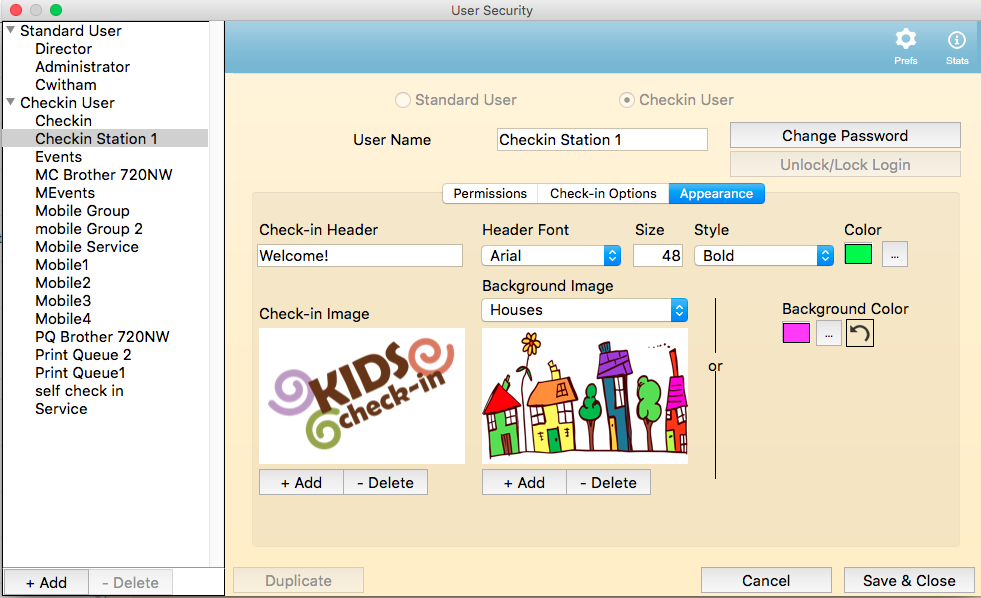
Check In Header – Enter the heading you’d like displayed on the Check-In Screen as well as the Header font, size and color.
Check In Image – Click on the plus sign to pull in your logo as the check-in image. This image will be displayed in the upper left of the check in screen.
Background Image – Use the drop down to select a stock photo as your background image. Or use the plus sign to pull in your own image.
Background Color – Select the color you’d like as the background on the check-in screen if you did not choose a background image.
Once you have selected all the information necessary for your check-in user, make sure to press the SAVE & CLOSE button.
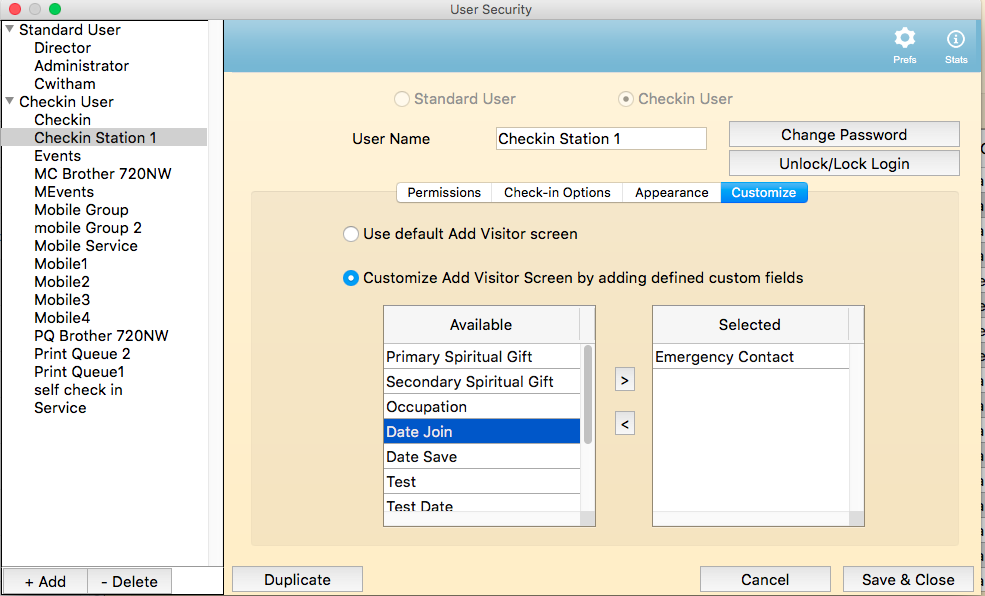
The Customize tab allows you to customize the Add Visitor screen when checking in by Individual.
To add custom fields to your Add Visitor screen, do the following:
- Mark the box for Customize Add Visitor. (Must be set to return by individual)
- Highlight the name of the custom field you'd like added to the screen.
- Click on the right arrow to move it to the Selected Column.
- Click SAVE & CLOSE to save that user defination.

Check-In User (Mobile) - Options
If you are creating a check-in user that will be used on a tablet or smartphone, there are a variety of options that will affect what is displayed on the screen and how the check in station operates.
The Permissions tab allows you to set the options for how the check-in station will operate.
Self Check In – if the check-in user has “self check in” marked, this user will not be able to view any address information from the people list screens or edit profile information.
On Screen Keyboard – if the check-in user has “On Screen Keyboard” marked, this will create a virtual keypad for the option to checkin using Search by Phone only.
Dashboard – if this option is marked, the check-in screen will include a tab called Dashboard. When the user taps on the Dashboard tab they will be able to view how many people have checked into each class today. They can further drill down and see who is checked into each class. We recommend using this option only for “manned” stations.
Default Campus - if system preferences are set to allow multiple campuses, each check-in user can have a default campus defined. This means that the user will only be able to check intogroups/classes/services that are from that campus. For example, if the check-in user has a default campus “Southside”, they will only see groups that also have Southside as the campus.
Check-Out – if the check out option is marked, then that user can also check students out of their classes through the system.
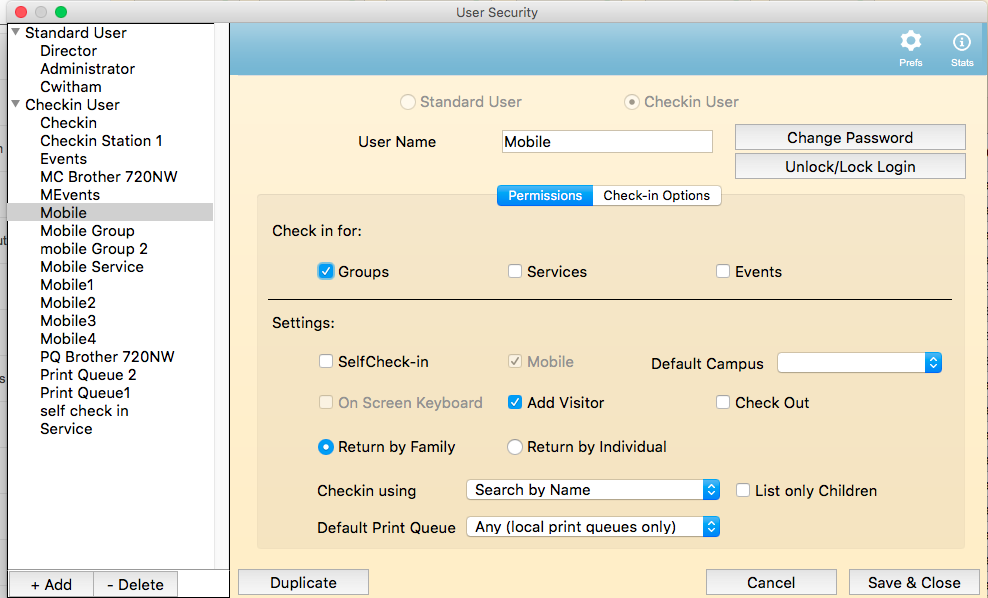
Add Visitor – if the add visitor option is marked, there will be an ADD VISITOR button on the check-in screen. This will allow the user to enter basic information about the visitor and check them into the appropriate class or meeting.
Check In Using – Indicate if you will pull up students based on their name or phone number. With mobile check-in users you can also check in by group, keyword, service or event. If one of these options is chosen the system will present a list of people enrolled in that group/keyword or service and the user simply marks who is present.
Return Families or Individuals – If you select return families, a list of families will be returned with that have that last name or phone number. If you select return individuals, a list of individual people with that last name or phone number will be returned.
List Only Children – if you are using the system to check kids into your Children’s Ministry or Daycare, you can limit the name that are returned to “only children”.
Default Print Queue – Select which print queue the name tags and parent tags should go to for this mobile check-in user. For example, let’s say we have some one checking in on the lower level with an iPad and another user checking in students on an iPad on the upper level. You can have two different printers … one on the lower level and one on the upper level. These printers will be defined as print queue users. You must associate the printer for each mobile user.
The Check In Options tab allows you to set which groups/classes will be displayed when the user hits the EDIT button. The different options are as follows:
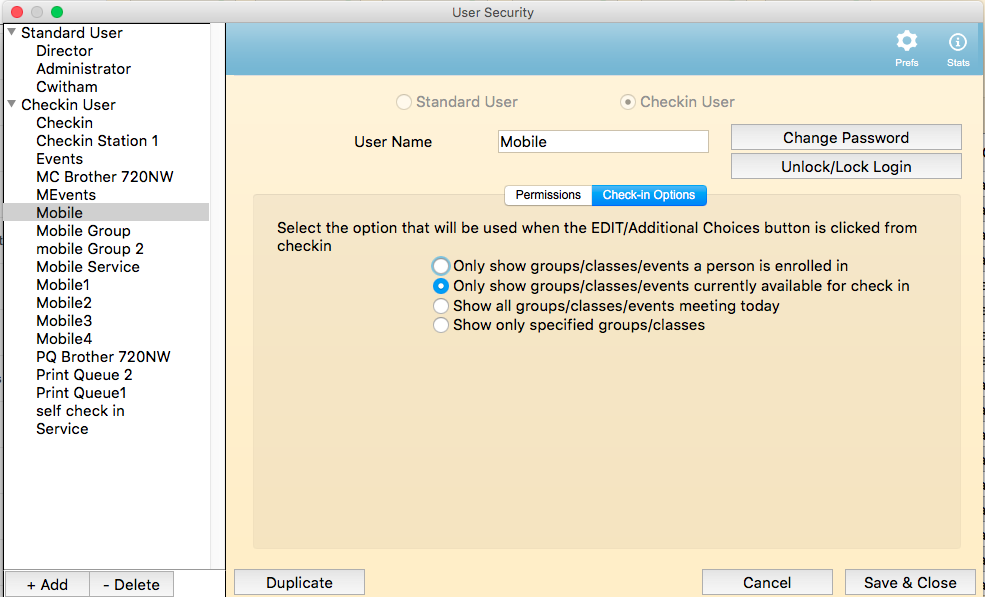
- Only show groups/classes a person is enrolled in. This option will limit check-in to only those classes that a child is pre-enrolled in or to recommended classes based on the age or grade range in the group definition.
- Only show groups/classes currently available. This option will limit check-in to those classes that are currently meeting within the check-in timeframe window.
- Show all groups/classes meeting today. This option will allow check-in, into any classes/groups that are meeting today.
- Show only specified groups/classes. This option will allow you to choose the specific classes/groups that are available.
Once you have selected all the information necessary for your check in user, make sure to press the SAVE & CLOSE button.
Check-In User (Print Queue) - Options
if you are using Mobile CheckIn and would like to print name tags and parent tags, you'll need to create at least one print queue user.
There are two types of print queue users:
- Local print queue. With a local print queue you need to have a Dymo printer connected via USB to a computer that is running Roll Call and logged in as this print queue users.
- Remote print queue. An example of a remote print queue would be a brother wireless printer. The brother printer driver must be installed on a computer that is logged into Roll Call.
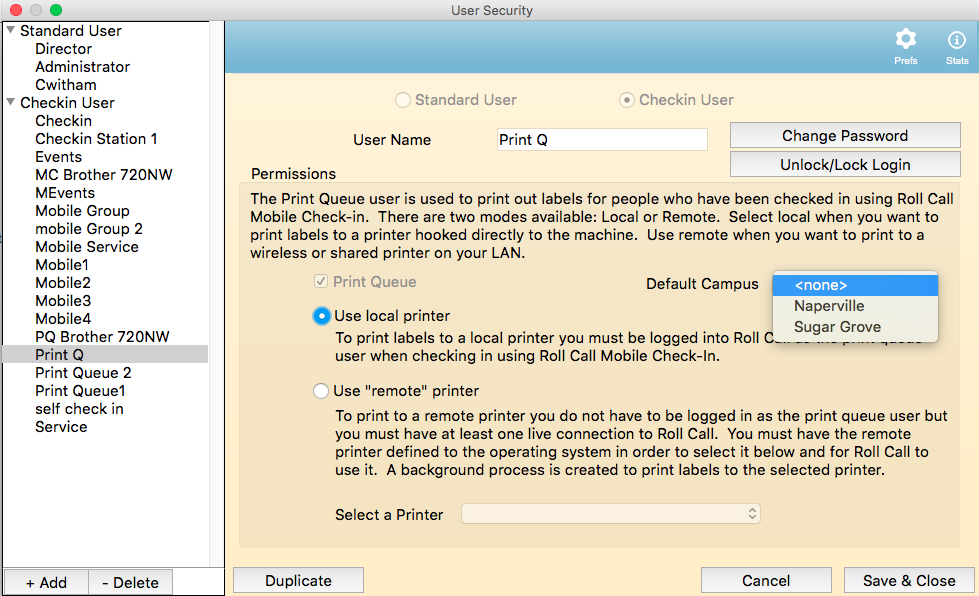
Default Campus - if system preferences are set to allow multiple campuses, each print queue in user can have a default campus defined.
Once you have selected all the information necessary for your check in user, make sure to press the SAVE button.